There are those who prefer not to do anything but ride their two-wheeled freedom machine for various reasons… Perhaps they don’t feel qualified to clean, lube, check the chain, wipe down the bike, clean the brakes, and so forth. Maybe there’s a significant other that excels at that sort of stuff. Or, perhaps they don’t like to get dirty – whatever it is: these folks are missing out on an important part of bike bonding.
I got into cycling when I was single so there wasn’t a dude around to help me figure out how to install a saddle, a stem, put on a tire, and do basic maintenance. I suppose if my wonderful Hubby was always involved I might have taken a bit longer to figure things out… but there’s something very rewarding about cleaning and maintaining your own bike. I’m not applying for sainthood here – I’m just very independent (and nosey) so I like to know how to do things myself.
If you don’t believe me, just ask The BikeMinded Guru, Justin: he’ll tell you all about
all the questions I ask him. Mostly, I remember the answers…
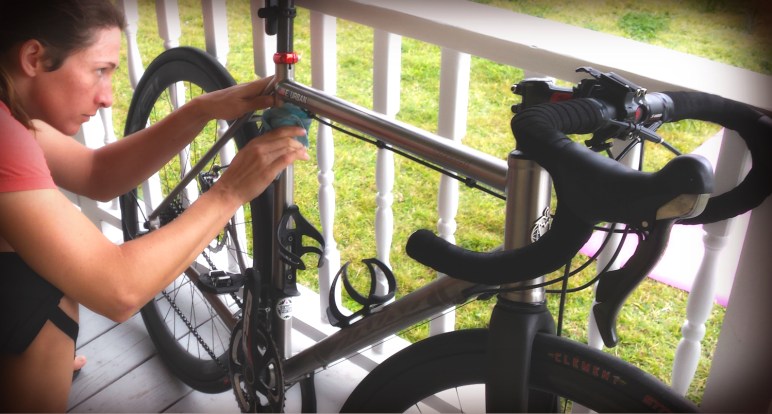
Bike Bonding through regular quality time with your steed will help you familiarize yourself with your bike. I always clean my own bike. Even if my husband offered (which he doesn’t) I will still clean my own bike. I do this because…
- It’s MINE and it’s my baby.
- I get to poke around and go “hmm” that doesn’t look right if I see something peculiar because I know every inch of my bike.
- It gives me a sense of pride that I take care of my own equipment.
- By taking regular responsibility for my own bike I am also keenly aware of what needs to be done and not dependent on another person.
I do not like being dependent. It was hell when I was dating too.
Here’s a Few Basics of Bike Bonding:
- Get to know what type of cleaner your bike likes. I ride Titanium, so WD40 works great for removing the grease, grime, and finger prints on the frame – but DO NOT use this on your gear-train for lubricant (it’s ok as a cleaner). For carbon, I always liked to use Windex to clean the frame, wheels, and spokes. It’s a simple all-purpose cleaner that gets off most stuff and doesn’t scratch. I do not like using water – regardless if I have a frame that is used in aerospace engineering. The gear train isn’t fond of water, so neither am I. I also find that a water hose just pushes dirt around into places you can’t get to clean it out.
TOP TIP: Blue shop towels or cheap microfiber towels work quite well to clean bikes. Sorry, Bounty – you aren’t the quicker picker upper here. Microfiber is preferred over shop towels because you won’t find little pieces of towel get in your gears later on.
 Learn how to clean and lube your chain. A clean, well lubricated (not over-lubricated) chain lasts longer and transfers less muck to your cassette (which is a real pain the arse to clean). I will clean my chain with a degreaser on a microfiber cloth about every two weeks. If it’s terribly mucky Park Tool, along with others, make a great chain cleaner that works reasonably well. The lube I prefer is Purple Extreme because it doesn’t attract a ton of dirt and does a great job. Once carefully applied, I spin the crankset a bit and then wipe off the excess.
Questions about the cleaning and chain lubing? Click HERE.
- Purchase a good chain checker and don’t be afraid to use it! Check your chain about once a month or so. If you are a competitive cyclist, you will be riding often enough to need to keep tabs on your chain wear. Changing a chain is cheaper than a new cassette. If you allow your chain to become too stretched – it will wear down your cassette! ☹
- Check your brakes for wear about twice a year. If you ride in hilly areas (Houston is not one of those), you will probably need to check brakes more often. Peek at the wear indicators to see how they are doing. If you have disc brakes – CLICK HERE for more info.
- Peek at those tires! Look for gashes, cuts, wear, or anything unusual (like bulges). This has saved me some serious inconveniences in the past. Also: be sure to pick a tire suited for the type of riding you tend to do. If you ride a lot around trashy shoulders, bumpy roads, or potential flat hazards – put on a set of puncture-resistant tires.
- Get to know the basics of gear adjustments and cable tension. I say this only because it has taken me FOREVER to finally feel comfortable adjusting the tension on my rear derailleur. This is usually the first one to start acting hinky and typically it’s exhibited through difficulty shifting to a larger, or easier, gear on the back. Reason: cable stretch. Cables will stretch over time and unless you like listening to it clack and grind – get to know how to adjust cable tension for your own peace of mind.
TOP TIP: Plan to have new cables installed periodically (usually during the annual total
maintenance). Cables wear just like everything else. Brake cables, gear cables, the whole lot. If you ride often, you definitely want to keep your steed in great running condition.
Oh, and by the way, when something starts acting funny or not shifting right, rolling right, squeaking, clicking, or grinding – please don’t wait until it breaks to fix it. If you ride in the country like I do – Uber doesn’t pick up at the corner of Buzzards Circling and Tumbleweed Lane. Just saying.
That’s the Bike Bonding Basics so Go Ride a Bike Already!
